
Unity ECS / DOTS introduction
This article is an attempt to introduce Unity’s new Entity Component System (ECS) to those who are unaware of its existence. ECS is one part of DOTS – the Data Oriented Technology Stack, which also contains the C# Job System and the Burst Compiler. ECS can be described in two ways; ridiculous performance increase and/or compact size. It is a new way to code, utilizing all of the cores available. The other two components of DOTS allow for similar performance increases, by compiling code to assembly and allowing for parallel code execution.
With the technology still in its infant stages, people are mostly using it for simulations that were practically impossible to run in a live environment before, trying out the limits. For example, here’s a real-time simulation of the expansion of a spiral galaxy with 70.000 stars – admittedly running on a beefy home PC, but doing so live, at 100 frames per second:
Or take a look at Unity’s own demo from 2018, which was created by just two people using this new technology:
Summary:
This article covers a brief introduction to coding in “pure ECS.” Pure ECS is what you typically use for instantiating massive amounts of entities (eg. bullet-spam), or if you want your level designers to scream in agony by creating everything in runtime, like a beautiful code novel, entirely away from the scene editor.

Also mind the fact that the ECS/DOTS systems are currently a work in progress, meaning that the code is subject to change. However, I have deemed (I, me, Dave the deemer) that the core philosophy of the concept is unlikely to change much, so learning this early is still very valuable. Plus, if Unity releases better tutorials later, you’ll have the benefit of repetition, which is how the human brain remembers. My Spanish exam certainly proved that we don’t learn things by not repeating them (rest in despacito, my spanish grades).
For reference, the information listed in this article primarily comes from the following video:
For general information on how these systems work, refer to the official documentation and introduction by Unity, found here:
Reading instructions:
This document is meant as an introduction to the DOTS concept, starting with ECS. No prior knowledge of the subject is assumed. However, a fairly strong familiarity with OOP is recommended, as I draw parallels to illustrate how this system works by comparison.
Required packages:
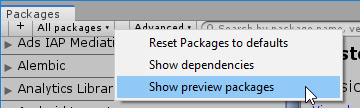
With a lot of the features used here being in development, installing the required packages to enable ECS takes a few clicks. When opening Unity, select Window > Package Manager. You’ll see a list of packages here, but to show the ones we need, click on the “Advanced” drop-down above the list, and select “Show Preview Packages“:
From here, install the following packages (some might already be installed):
- Entities
- Mathematics
- Hybrid Renderer
ECS:
The primary difference between working with traditional objects in Unity (derived from monobehaviour) and ECS, is that ECS is data-oriented:
- In monobehaviour you have the data (variables) and behaviors (functions) contained within the same class.
- In ECS, the data is declared as a struct in one file (the component), the behaviours as a class in another file (the system) and the instantiation of data for an entity (the ECS-version of an object) happens in a third file (called the, erh, not sure, but this is where we summon the limes).
To summarize this in a way my own brain can process:
- Components hold data
- Systems do work on that data
- Entities are instances of component data, so that multiple entities can have different values for their components (eg. different locations, health amount etc.).

Entities generally hold multiple different components, but for a first example, let’s start with just one component. I created three files to illustrate how this system works:
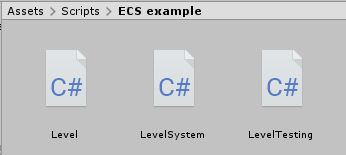
The file named “Level” is the Component, “LevelSystem” is the System and “LevelTesting” is the one that instantiates the Entity. Let’s take a look at the code inside each file, which creates an entity containing a single component, with a float value for a “level”, which increases over time:
Level.cs:
using Unity.Entities;

/// <summary>
/// Note that components are always structs
/// </summary>
public struct LevelComponent : IComponentData
{
    public float level;
}
Tadaaa (a clever anagram for “dataaa”)! While this component file is fairly straight forward, there’s a few things that are important to note:
- This file is using the Unity.Entities library, containing the functionality needed to work with the component as intended.
- The component is declared as a struct and inherits from IComponentData. This should always be the case for components.
LevelSystem.cs:
using UnityEngine;
using Unity.Entities;

/// <summary>
/// ComponentSystem allows for this code to be executed on its own,
/// without being attached to any entities or game objects in Unity
/// </summary>
public class LevelSystem : ComponentSystem
{
    protected override void OnUpdate()
    {
        // Iterate through all entities containing a LevelComponent
        Entities.ForEach((ref LevelComponent levelComponent) =>
        {
            // Increment level by 1 per second
            levelComponent.level += 1f * Time.deltaTime;
        });
    }
}
The System part of the ECS architecture is what manipulates the data from the Component. Systems run in the background, manipulating the data held in all relevant entities. As specified by OnUpdate, this one runs every frame. Things here that are important to acknowledge:
- As with the components, the file needs the Unity.Entities library.
- The system is declared as a class, inheriting from ComponentSystem
- The OnUpdate function is what performs the data modification. It runs every frame. Just like in MonoBehaviour, there’s also a Start function and a few others.
The contents of OnUpdate needs a little more explanation than just a bullet point. Consider the following line of code:
Entities.ForEach();The Entities called here is a reference from the Entities library. By accessing its member function ForEach, it is possible to iterate through all existing entities, leveling up the limes. While this might sound cumbersome in writing, it runs really fast, as the system only touches what we tell it to, ignoring everything else. This is specified with the following code, inside the ForEach statement:
(ref LevelComponent levelComponent) =>
        {
            // Increment level by 1 per second
            levelComponent.level += 1f * Time.deltaTime;
        }
This tells the system to access the LevelComponent of any entity containing one, then modifying it by reference. Because LevelComponent was defined with a public float named level, this is now accessible for modification, which allows us to increment it by 1 each second. Don’t let this run for too long though, who knows what the limes will do when they reach level 9000.
LevelTesting.cs (instantiating entities):
There are more than one way to create new entities. To begin with, I will simply show how to create one and directly modifying its component data, using the Entity Manager from the Entities library:
using UnityEngine;
using Unity.Entities;

public class LevelTesting : MonoBehaviour
{
    private void Start()
    {
        EntityManager entityManager = World.Active.EntityManager;

        Entity entity = entityManager.CreateEntity(typeof(LevelComponent));

        entityManager.SetComponentData(entity, new LevelComponent { level = 10 });
    }
}
Remember how an entity is an instance of component data? This line is what instantiates it:
Entity entity = entityManager.CreateEntity(typeof(LevelComponent));It simply asks the manager to create a new instance of the specified component data, which is what an entity is – let there be lime! Since the reference to the entity is stored in the entity variable here, it is also possible to modify the data stored in the entity by the following line:
entityManager.SetComponentData(entity, new LevelComponent { level = 10 });The SetComponentData member function takes a reference to the entity we’ve just initialized, then initializes a new value for the LevelComponent of the entity, with the specified value(s).
To round off entity creation, it is common for entities to have multiple components. But instead of listing all of the components in the call to CreateEntity from above, it is possible to create an Archetype, which is an entity blueprint with a list of components. Here is the whole code example from above, rewritten with an archetype, which also contains the translation component from Unity. Because we want to know where the limes go:
using UnityEngine;
using Unity.Entities;
using Unity.Transforms;

public class NewTesting : MonoBehaviour
{
    private void Start()
    {
        EntityManager entityManager = World.Active.EntityManager;

        EntityArchetype entityArchetype = entityManager.CreateArchetype(
            typeof(LevelComponent),
            typeof(Translation)
            );

        Entity entity = entityManager.CreateEntity(entityArchetype);

        entityManager.SetComponentData(entity, new LevelComponent { level = 10 });
    }
}
The line to pay attention to is this:
        EntityArchetype entityArchetype = entityManager.CreateArchetype(
            typeof(LevelComponent),
            typeof(Translation)
            );
The CreateArchetype command simply takes a list of components for the desired archetype, which can then be used when creating new entities.
To execute this code, simply put the LevelTesting.cs file on a Unity gameobject in the scene. Entities do not show up in the scene hierarchy. Instead, when playing the scene, go to the Window > Analysis > Entity Debugger, where the entity will be shown with the LevelComponent and Translation components.
Multiple entities (w. Rendering & translation):
That’s it for creating a single entity. However, ECS is capable of handling metric tons of them. Did I mention an insurmountable quantity of limes? ECS has a feature which lets it populate an array with entities, making it easy to create way more than you’ll ever need. And of course we’ll want to see the limes, so as a little bonus, I’ve also shown how to add a mesh and material to your limes as well:
using UnityEngine;
using Unity.Entities;
using Unity.Transforms;     // Translation
using Unity.Collections;    // NativeArray
using Unity.Rendering;
using Unity.Mathematics;

public class Testing : MonoBehaviour
{
    [SerializeField] private Mesh mesh;
    [SerializeField] private Material material;

    private void Start()
    {
        EntityManager entityManager = World.Active.EntityManager;

        EntityArchetype entityArchetype = entityManager.CreateArchetype(
            typeof(LevelComponent),
            typeof(Translation),             typeof(RenderMesh),  // Rendering
            typeof(LocalToWorld) // Coordinate conversion
            );

        NativeArray<Entity> entityArray = new NativeArray<Entity>(30000, Allocator.Temp);
        entityManager.CreateEntity(entityArchetype, entityArray);

        for(int i = 0; i < entityArray.Length; i++)
        {
            Entity entity = entityArray[i];
            entityManager.SetComponentData(entity, new LevelComponent { level = UnityEngine.Random.Range(10f, 20f) });
            entityManager.SetComponentData(entity, new Translation { Value = new float3 (UnityEngine.Random.Range(-500f, 500f), UnityEngine.Random.Range(-100f, 100f), (UnityEngine.Random.Range(-500f, 500f))) });

            entityManager.SetSharedComponentData(entity, new RenderMesh {
                mesh = mesh,
                material = material,
            });
        }
        entityArray.Dispose();
    }
}
The result?
The first code which we should examine, is this:
NativeArray<Entity> entityArray = new NativeArray<Entity>(30000, Allocator.Temp);
entityManager.CreateEntity(entityArchetype, entityArray);
In the first line, a new array of type Entity is created, with a size of 30.000. Note how there is a command for allocating memory in the array declaration. The NativeArray doesn’t use garbage collection, which means we have to do that ourselves. By writing Allocator.Temp, memory is temporarily allocated for this array to be populated. Why temporary? In this case, the array is only used to instantiate new entities, so it should not be used for anything afterwards.

Then there’s the familiar call to CreateEntity from the entityManager. This takes parameters for the archetype which should be created, and then the array which should be populated. Doing this will automatically create as many entities as there are elements in the array.
Next we’ll want to modify the values of these entities, one at a time. This is done with a for-loop through the entity array:
for(int i = 0; i < entityArray.Length; i++)
{
   Entity entity = entityArray[i];
   entityManager.SetComponentData(entity, new LevelComponent { level = UnityEngine.Random.Range(10f, 20f) });
   entityManager.SetComponentData(entity, new Translation { Value = new float3 (UnityEngine.Random.Range(-500f, 500f), UnityEngine.Random.Range(-100f, 100f), (UnityEngine.Random.Range(-500f, 500f))) });

    entityManager.SetSharedComponentData(entity, new RenderMesh {
            mesh = mesh,
            material = material,
       });
}
For each element in the array, the temporary reference entity is established, then the component data for level and translation is set by the given parameters, just like before. In this case it’s mostly randomized, just to spread out the entities, now that we’ll want to render them.
Before I describe the rendering process, let’s go back to the top of the class declaration again, where we’ll see the following lines:
    [SerializeField] private Mesh mesh;
    [SerializeField] private Material material;
These lines expose the private variables for the Mesh and Material to the inspector, where they can be set. These can be whatever you want, but for this example I’ve chosen the built-in capsule mesh (closest thing to a lime) and some random lime texture I found on the internet:

Going back into the for-loop, these variables can now be used to set the mesh and material for the entity, given the following lines:
entityManager.SetSharedComponentData(entity, new RenderMesh {
mesh = mesh,
material = material,
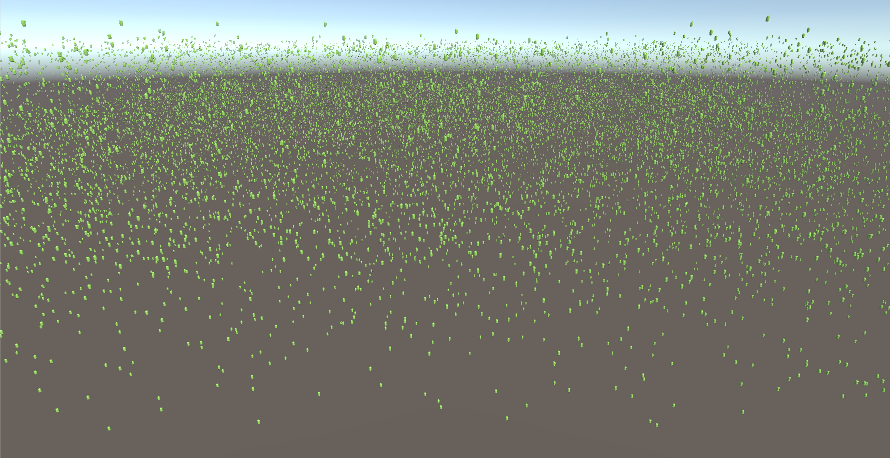
});To be honest, maybe they should not be named identically like I have done here, but the syntax knows that what is on the left of the equal sign, is the RenderMesh variable. With these lines, the entities will now display on the screen with their given mesh and material, positioned with the random distribution given to them earlier in the for-loop. Let’s take a look at the limes again, just because:

Before I wrap up the ECS introduction, there’s one really important line to remember. After the for-loop, we have to get rid of the array:
entityArray.Dispose();The Dispose member function deletes the array, which we only needed for creating the entities.

Deleting the array won’t affect the entities, as it only contains their addresses in memory, not the actual data. Doing this prevents issues like memory leaks and is just good practice in general. You don’t want limes all over your memory.