Unity C# Job system and Burst Compiler/DOTS introduction
The Jobs System in Unity allows for the execution of code across multiple cores at once, significantly speeding up heavy tasks such as pathfinding and similarly repetitive logic. Additionally, when something is set to run as a job, Unity supports use of the Burst Compiler, which will compile that bit of code into high-performance assembly code.
Source material:
Reading instructions:
This document is a follow-up to the previous article on ECS, as part of an introduction to working with DOTS as a whole. I recommend reading the ECS article first, but it’s not mandatory. A decent familiarity with OOP is recommended.
Required packages:
With these features being in development, installing the required packages takes a few clicks. When opening Unity, select Window > Package Manager. You’ll see a list of packages here, but to show the ones we need, click on the “Advanced” drop-down above the list, and select “Show Preview Packages“:

From here, install the following packages (some might already be installed):
- Jobs
- Burst
- Mathematics
- Collections
The C# Job System / Burst Compiler:
The C# Job System is a way to provide safe multi-threading of code, allowing for much faster, parallel execution, without the usual timing risks. The reason this system is considered safe when compared to traditional multi-threading, is that each job uses a copy of the data it works on, rather than a reference to it. This prevents timing-related bugs where two different threads were to work on the same data via reference (an issue called race condition, the bane of my existence).

The C# Job System:
Before we can burst compile any code, we’ll need to write it as a job. Here is a code example showing the difference between a normal function call (ReallyToughTask) and scheduling a job (ReallyToughJob). Each of these contain the same code, to illustrate how easy it is to transition between the concepts:
using UnityEngine;
using Unity.Mathematics;
using Unity.Jobs;

public class NewJobTesting : MonoBehaviour
{
    // Update is called once per frame
    void Update()
    {
        float startTime = Time.realtimeSinceStartup;
        ReallyToughTask();

        JobHandle jobHandle = ReallyToughTaskJob();
        jobHandle.Complete();

        Debug.Log(((Time.realtimeSinceStartup - startTime) * 1000f) + "ms");
    }

    private void ReallyToughTask()
    {
        float value = 0f;
        for(int i = 0; i < 50000; i++)
        {
            value = math.exp10(math.sqrt(value));
        }
    }

    private JobHandle ReallyToughTaskJob()
    {
        ReallyToughJob job = new ReallyToughJob();
        return job.Schedule();
    }

    public struct ReallyToughJob : IJob
    {
        public void Execute()
        {
            float value = 0f;
            for (int i = 0; i < 50000; i++)
            {
                value = math.exp10(math.sqrt(value));
            }
        }
    }
}
In this script, we’ve got a regular function called ReallyToughTask, which performs a bunch of calculations. And then there’s ReallyToughJob, which is the job version of that function. Let’s take a look at the two by comparison:
ReallyToughTask:
    private void ReallyToughTask()
    {
        float value = 0f;
        for(int i = 0; i < 50000; i++)
        {
            value = math.exp10(math.sqrt(value));
        }
    }
ReallyToughJob:
    public struct ReallyToughJob : IJob
    {
        public void Execute()
        {
            float value = 0f;
            for (int i = 0; i < 50000; i++)
            {
                value = math.exp10(math.sqrt(value));
            }
        }
    }
A job should always be a struct and inherit from IJob (or one of the other job types), which comes from the Unity.Jobs library. The reason it is a struct and not a class, is that structs let us work with a copy, rather than a reference, so we don’t end up with the aforementioned race conditions. This is one of the reasons the job system is considered safe.

Inside the job we’ll find pretty much the same code as in the other function, but sandwiched inside yet another function called Execute, which defines what should be run when the job is called.
When scheduling a job, we need to take a few more steps than when calling a function. First of all, we should create a job handle to handle the job:
    private JobHandle ReallyToughTaskJob()
    {
        ReallyToughJob job = new ReallyToughJob();
        return job.Schedule();
    }
Note what returns is not the result of the job, but the act of scheduling it, after it has been instantiated. This is necessary for control of the code execution, such as pausing the main thread until the job has finished, as seen in the following two lines from the Update function above:
        JobHandle jobHandle = ReallyToughTaskJob();
        jobHandle.Complete();
While it may seem a little overkill to have a whole separate piece of code just for scheduling the job, this is also very useful when multiple jobs run in sequence, with one job depending on the completion of another before it can be executed. Here’s an example from the Unity documentation, showcasing how the jobhandle can be used for scheduling in sequence:
JobHandle firstJobHandle = firstJob.Schedule();
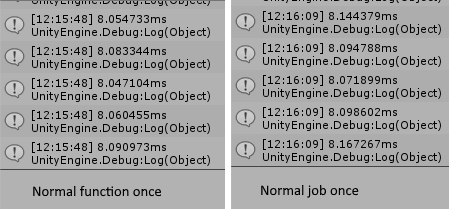
secondJob.Schedule(firstJobHandle);But how does the job perform, compared to the normal function? It’s quite a bit of extra code for the same functionality. Let’s compare the run times:

Right now, they are practically the same. The reason for this, is that they each perform the same calculation, just once. But the power of the C# job system comes from the fact that it can multi-thread. To showcase how well this works, here’s a new version of the code from before (excluding the parts that remain unchanged). I made some changes to the Update function, added a bool to easily swap between using and not using the job, as well as as included the Unity.Collections library:
using UnityEngine;
using Unity.Mathematics;
using Unity.Jobs;
using Unity.Collections;

public class JobTesting : MonoBehaviour
{

    [SerializeField] private bool useJobs;

    // Update is called once per frame
    void Update()
    {
        float startTime = Time.realtimeSinceStartup;
        if(useJobs)
        {
            // List of jobs to be executed in parallel
            NativeList<JobHandle> jobHandleList = new NativeList<JobHandle>(Allocator.Temp);

            for (int i = 0; i < 10; i++)
            {
                JobHandle jobHandle = ReallyToughTaskJob();
                jobHandleList.Add(jobHandle);
            }

          // Pauses main thread until all contained jobhandles are completed
            JobHandle.CompleteAll(jobHandleList);
            jobHandleList.Dispose(); // Dispose list
        }
        else
        {
            for(int i = 0; i < 10; i++)
            {
                ReallyToughTask();
            }
        }
        Debug.Log(((Time.realtimeSinceStartup - startTime) * 1000f) + "ms");
    }
}
In this version of the Update function, we either call the function or schedule the job, 10 times each tick. The most important thing to note from this example is the following code:
// List of jobs to be executed in parallel
NativeList<JobHandle> jobHandleList = new NativeList<JobHandle>(Allocator.Temp);

for (int i = 0; i < 10; i++)
{
    JobHandle jobHandle = ReallyToughTaskJob();
}

// Pause main thread until all contained jobhandles are completed
JobHandle.CompleteAll(jobHandleList);
jobHandleList.Dispose(); // Dispose list
In order to handle the scheduling of multiple jobs at the same time, we’ve created a NativeList of jobhandles, which we can iterate through. This makes it possible to wait for all of the jobs in that list to be completed, by calling the CompleteAll member function from JobHandle, passing in the list of jobs as a parameter. The list is disposed when we’re done working with it, as the garbage collector does not handle these.
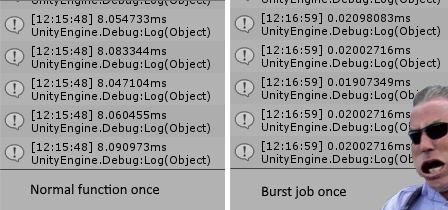
Let’s compare runtimes again, 10 function calls vs 10 scheduled jobs:
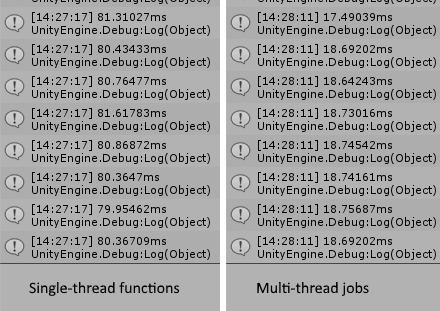
That’s a pretty significant improvement! We can see here that I don’t have enough threads available to run all 10 jobs at once, as that would have given similar times to when we were only running the one job. All this without even burst compiling.
The Burst Compiler:
If we continue using the code example from above, let’s add the burst compiler attribute to the job declaration. That’s literally all it takes to implement it. Just make sure to include the Unity.Burst library, then we can take the job declaration from above and write it like this:
    [BurstCompile]
    public struct ReallyToughJob : IJob
    {
        public void Execute()
        {
            float value = 0f;
            for (int i = 0; i < 50000; i++)
            {
                value = math.exp10(math.sqrt(value));
            }
        }
    }
With this attribute, the job code will now compile to assembly code, making it run much faster.

For comparison, let’s look at another side-by-side of the script in action, with the normal function loop and the scheduled job loop w. the burst compiler:
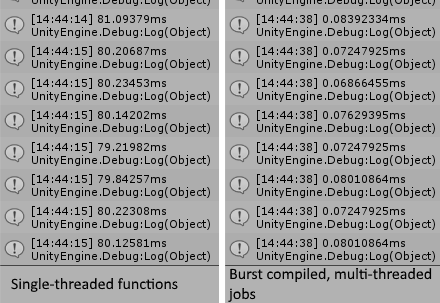
That’s so much faster, running the calculation ten times only takes about a hundredth of the time it took to run the calculation once, without the burst compiler enabled.

This goes to show how useful burst compiling is, for pretty much anything that can be burst compiled. Burst compile as much as possible! Burst compile your jobs, your dog, your microwave, your house etc. To illustrate, here’s the very first code example with the single job, but burst compiled:
Turns into
Jobs, data and for-loops:
Before you stumble back into the internet wilderness, there’s a few more aspects of the C# Job System you should really know.
Copying data from the main thread:
As I have eluded a couple of times, jobs are copies of data rather than references. Because of this, we can’t refer directly to anything from the main thread, such as the position of an object, because the job isn’t in the main thread. To solve this problem, we will have to write additional variable declarations, to copy the information from the main thread into the job, before it wanders off to do its own thing.

We have partially done this already, in the ReallyToughJob declaration with the “value” float. But it is possible to set the value of this variable when scheduling the job. Here I have rewritten the ReallyToughJob declaration to no longer initialize the value of the “value” float:
    public struct ExampleJob: IJob
    {
        public void Execute()
        {
            float value;
            for (int i = 0; i < 50000; i++)
            {
                value = math.exp10(math.sqrt(value));
            }
        }
    }
Now, when scheduling this job, we will have to initialize value like this:
    private JobHandle ReallyToughTaskJob()
    {
        ReallyToughJob job = new ReallyToughJob();
        job.value = 0f;
        return job.Schedule();
    }
With this, we can copy anything from the main thread before the job is scheduled, which is super useful.
Jobs and for-loops:
Additionally, there are multiple different types of jobs, aside from IJob. What we have done so far, is to run a for-loop which schedules a single job multiple times. But a job type great for looping like this, is IJobParallelFor, which is a for-loop in itself. It has functionality that lets us say how the loop is split between threads, further increasing the level of control that we have over how the program executes.

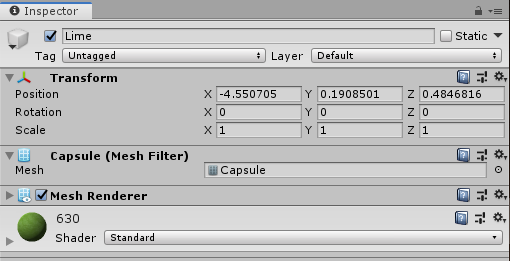
Remember the floating limes from the ECS example? Let’s bring back a handful and make them float again! Only this time we’ll use the IJobParallelFor structure instead of the ECS code to do so. I’ve created a simple lime prefab, containing only a mesh and a texture:
On my potato laptop, I can instantiate and move about 15000 of these around the screen, at about 25 fps. Before introducing the IJobParallelFor system, take a look at the code which we will be adding it to. I’ve created a file called LimeJobs:
using System.Collections.Generic;
using UnityEngine;
using Unity.Jobs;
using Unity.Mathematics;
using Unity.Burst;
using Unity.Collections;
public class LimeJobs : MonoBehaviour
{
[SerializeField] private bool useJobs;
[SerializeField] private Transform prefabLime; //Init via inspector
private List<Lime> limeList;
public class Lime
{
public Transform transform;
public float moveY;
}
private void Start()
{
limeList = new List<Lime>();
// Instantiate and randomly position limes
for (int i = 0; i < 15000; i++)
{
Transform limeTransform = Instantiate(prefabLime, new Vector3(UnityEngine.Random.Range(-12f, 12f), UnityEngine.Random.Range(-5f, 5f), UnityEngine.Random.Range(-8f, 8f)), Quaternion.identity);
limeList.Add(new Lime
{
transform = limeTransform,
moveY = UnityEngine.Random.Range(1f, 2f)
});
}
}
// Update is called once per frame
void Update()
{
float startTime = Time.realtimeSinceStartup;
// Move the limes up and down
foreach(Lime lime in limeList)
{
lime.transform.position += new Vector3(0, lime.moveY * Time.deltaTime);
if(lime.transform.position.y > 5f)
{
lime.moveY = -math.abs(lime.moveY);
}
if (lime.transform.position.y < -5f)
{
lime.moveY = +math.abs(lime.moveY);
}
}
Debug.Log(((Time.realtimeSinceStartup - startTime) * 1000f) + "ms");
}
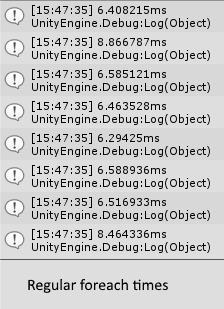
}This spawns the aforementioned 15000 limes and bobs them up and down the screen. The time it takes to run this code on my computer is this:
So how do we make this kind of code run multi-threaded? Let’s start by taking a look at the syntax for the IJobParallelFor job type:
[BurstCompile]
public struct ReallyToughParallelJob : IJobParallelFor
{
    public void Execute(int index)
    {
       //Code goes here
    }
}
The big difference between this and a regular job, is the index parameter in the Execute declaration, which is what we will use to iterate through the list of limes. Next, we’ll need to declare the data we’ll want to use, so we can work with it outside the main thread. In this case we’re working with a Vector3 for the position, and a float for modifying that position. So I put this in:
[BurstCompile]
public struct ReallyToughParallelJob : IJobParallelFor
{
    public NativeArray<float3> positionArray;
    public NativeArray<float> moveY;
    public float deltaTime;

    public void Execute(int index)
    {
       //Code goes here
    }
}
Notice how we’re using float3 instead of Vector3. It’s just a float with 3 values, which can similarly be accessed by using .x, .y, and .z. We’re using an array of each, to iterate through the positions of each lime, using their respective moveY values as well. As for the deltaTime variable, we can’t access Time.deltaTime outside of the main thread, so we simply have to pass it in here as well.

Next we’ll paste in the code from the foreach loop in the Update function, replacing the lime positions, moveY, and Time.deltaTime, with the variables that are declared inside the job.
These:
lime.transform.position
moveY
Time.deltaTime
Turn into these:
positionArray[index]
moveYArray[index]
deltaTime
This way, references to anything from the main thread are replaced with references to the variables from the job. Note how the positionArray and moveYArray make use of the aforementioned index variable, which is how the job iterates through the different sets of data. The job should look like this:
[BurstCompile]
public struct ReallyToughParallelJob : IJobParallelFor
{
    public NativeArray<float3> positionArray;
    public NativeArray<float> moveYArray;
    public float deltaTime;

    public void Execute(int index)
    {
        positionArray[index] += new float3(0, moveYArray[index] * deltaTime, 0f);

        if(positionArray[index].y > 5f)
        {
            moveYArray[index] = -math.abs(moveYArray[index]);
        }

        if (positionArray[index].y < -5f)
        {
            moveYArray[index] = +math.abs(moveYArray[index]);
        }
    }
}
With the job set up, we’ll need to schedule it back in the Update function. Here’s what such scheduling looks like on its own:
// Create arrays for copying data into
NativeArray<float3> positionArray = new NativeArray<float3>(limeList.Count, Allocator.TempJob);
NativeArray<float> moveYArray = new NativeArray<float>(limeList.Count, Allocator.TempJob);

// Populate the arrays
for(int i = 0; i < limeList.Count; i++)
{
    positionArray[i] = limeList[i].transform.position;
    moveYArray[i] = limeList[i].moveY;
}

// Create job w. data
ReallyToughParallelJob reallyToughParallelJob = new ReallyToughParallelJob
{
     deltaTime = Time.deltaTime,
     positionArray = positionArray,
     moveYArray = moveYArray,
};

// Schedule job
JobHandle jobHandle = reallyToughParallelJob.Schedule(limeList.Count, 100);
jobHandle.Complete();

// Update to calculated values
for(int i = 0; i < limeList.Count; i++)
{
    limeList[i].transform.position = positionArray[i];
    limeList[i].moveY = moveYArray[i];
}

// Dispose arrays
positionArray.Dispose();
moveYArray.Dispose();
As is evident from the comments in the code, there’s a few steps you must follow, to ensure that everything is working and there are no memory leaks.

Here’s a list of these steps, alongside explanations for each step:
Step one: Create arrays for copying data into.
We must create arrays to hold the data we need. The reason we are using arrays, is due to the fact that we are handling multiple objects. Each array represents a component we want to do work on (positionArray) or data required to do that work (moveYArray).
NativeArray<float3> positionArray = new NativeArray<float3>(limeList.Count, Allocator.TempJob);
NativeArray<float> moveYArray = new NativeArray<float>(limeList.Count, Allocator.TempJob);
Step two: Populate arrays.
With the arrays established, we must copy the required data into them. In this case we’re copying all of the positions of the objects, as well as their moveY values.
for(int i = 0; i < limeList.Count; i++)
{
    positionArray[i] = limeList[i].transform.position;
    moveYArray[i] = limeList[i].moveY;
}
Step three: Create job w. data from populated arrays.
An instance of the job which we wish to schedule, must be instantiated. Here we copy all of the data from the arrays into the job, so it can go off and do work with it, away from the main thread. The job variables are the ones on the left.
ReallyToughParallelJob reallyToughParallelJob = new ReallyToughParallelJob
{
       deltaTime = Time.deltaTime,
       positionArray = positionArray,
       moveYArray = moveYArray,
};
Step four: Schedule job.
A JobHandle is created to handle the job being scheduled. Here we pass in the number of steps we want it to iterate, as well as how many of these steps we want each thread to handle. In this case, we’re iterating once for each lime, and we want each thread to handle 100 of those iterations. Finally, with a call to jobHandle.Complete(), we pause the main thread until the task has been completed.
JobHandle jobHandle = reallyToughParallelJob.Schedule(limeList.Count, 100);
jobHandle.Complete();
Step five: Update to calculated values.
With the new values being calculated, we need to put them back into their respective objects.
for(int i = 0; i < limeList.Count; i++)
{
    limeList[i].transform.position = positionArray[i];
    limeList[i].moveY = moveYArray[i];
}
Step six: Dispose arrays.
Finally, the arrays must be disposed of. This is not always necessary, but since the arrays have been assigned as only temporary allocations, this must be done to ensure that there are no memory leaks.
positionArray.Dispose();
moveYArray.Dispose();
With this, we’re almost done! However, I want to prove a little something to show what the code we’ve just written, actually does. Because right now we’re just adding/subtracting values, which is something that the CPU already does incredibly well. That means we can keep spawning more and more limes, both with and without using the job system, until they both start lagging at the same amount of limes:
This happens because the CPU is not the bottleneck here – but rather the GPU, as we reach the tipping point for how many objects it can render. Keep in mind, we’re using Unity’s default material, so we’re rendering a giant lime cake, stuffed with creamy overdraw, everything rendering on top of each other.

The real benefit of this system is more apparent when we do something more mathematically intensive. Let’s grab the heavy equation from the first examples, and paste it in right after we’ve calculated the positions – both in the update function and in the job definition. The foreach loop in the update function should then look like this (the last few lines is where the equation is):
            foreach (Lime lime in limeList)
            {
                lime.transform.position += new Vector3(0, lime.moveY * Time.deltaTime);
                if (lime.transform.position.y > 5f)
                {
                    lime.moveY = -math.abs(lime.moveY);
                }

                if (lime.transform.position.y < -5f)
                {
                    lime.moveY = +math.abs(lime.moveY);
                }

                float value = 0f;
                for (int i = 0; i < 50000; i++)
                {
                    value = math.exp10(math.sqrt(value));
                }
            }
And likewise, the definition for ReallyToughParallelJob should look like this:
[BurstCompile]
public struct ReallyToughParallelJob : IJobParallelFor
{
public NativeArray<float3> positionArray;
public NativeArray<float> moveYArray;
public float deltaTime;
public void Execute(int index)
{
positionArray[index] += new float3(0, moveYArray[index] * deltaTime, 0f);
if(positionArray[index].y > 5f)
{
moveYArray[index] = -math.abs(moveYArray[index]);
}
if (positionArray[index].y < -5f)
{
moveYArray[index] = +math.abs(moveYArray[index]);
}
float value = 0f;
for (int i = 0; i < 50000; i++)
{
value = math.exp10(math.sqrt(value));
}
}
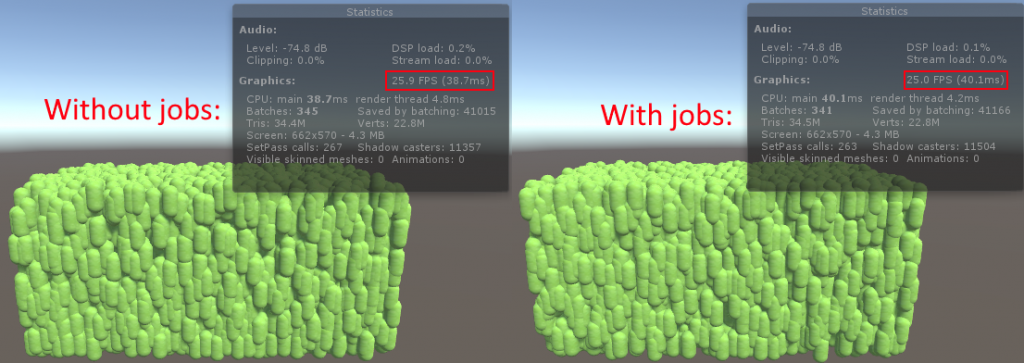
}Now we can’t spawn nearly as many limes (we did 15.000 in the previous picture – this time we’re only doing 100), because each of them requires this equation to be run as well. Let’s do another performance comparison, with and without jobs:
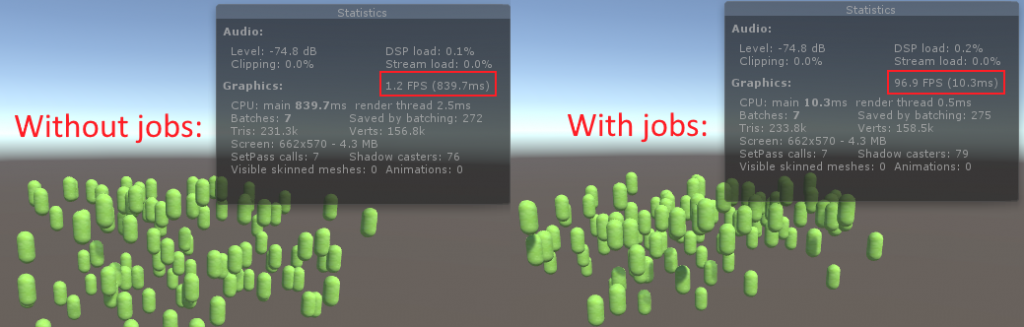
From 1 FPS to 100 FPS. It certainly still works! But the reason I did this without the extra calculation first, was to illustrate that the job system is not a miracle cure-all, especially when using traditional MonoBehaviour-derived game objects like these. That is why we are moving towards the application of both ECS and Jobs combined, to really maximize the performance we can get – both with rendering visuals and computing logic.
Rounding off:
This covers the general basics of how jobs are written. With jobs not relying on ECS architecture to run, this can be a decent middle-road solution, for those who have already written most of their project’s code in traditional MonoBehaviour. Any computationally heavy for-loops or similar repeated calls in your code, where the steps can be run in parallel, can be rewritten this way to amp up your performance.
Also note that there are other types of jobs, beyond the two shown here in the article. For example, IJobParallelForTransform is like IJobParallelFor, but specifically made to operate on transforms. A good example of this being implemented, can be found towards the end of the video listed as “source material” in the beginning of this article (or click here).
In the next article I will take a look at scene editing with ECS, which takes a bit more structuring than regular scene editing in Unity, but can really help create far bigger and more detailed environments than what is possible with MonoBehaviour.