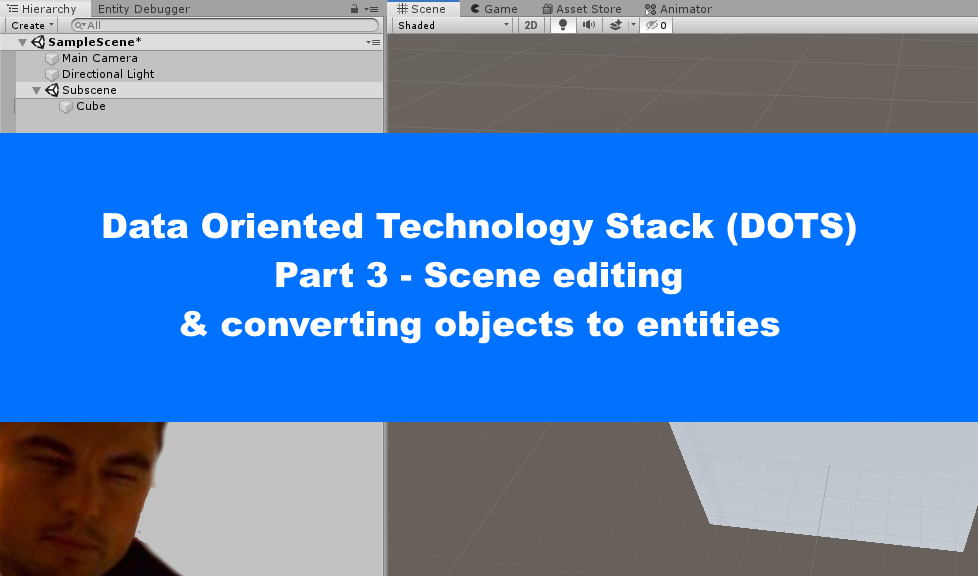
Scene editing and ECS conversion
When working with the DOTS framework and implementation of ECS, you’ll quickly realize that there is currently very little in the way of scene editing. Entities might render, but you can’t interact with them in the scene editor. The workaround for this problem allows for the conversion of a scene, into entities. However, any traditionally written code (using monobehaviour, that is) will be lost in translation. This article covers how you should write your code in ECS and attach it to your scene objects, in order to execute logic on them when they turn into entities.
The code examples used in this document, are from the following tutorial:
Reading instructions:
I recommend reading my article about ECS before continuing with this one. While you do not need to understand ECS to be able to convert objects to entities, you can’t apply scripts to those entities unless they are written with the ECS architecture. The same goes for the previous article on the Job System and the Burst Compiler.
Please note: I may be using the words “gameobject” and “entity” interchangeably, when referring to the same thing. This is due to how we convert back and forth between something being a gameobject and an entity all the time, as the state of it depends on whether or not the scene is being edited. It’s not the most technically accurate representation; the entity is data oriented while the game object is object oriented. But the process makes it difficult to use just the one name for it.
Package inclusion:
When setting up Unity to work with DOTS, there’s a few packages that must be included in order to access the desired logic. At the time of writing this article, most of the features we need are still in development, meaning that Unity should be set to show “Preview packages” before the items appear. The packages that we’ll need are the following:
- Entities (0.1.1)
- Jobs (0.1.1)
- Mathematics (1.1.0)
- Burst (1.1.2)
- Hybrid renderer (0.1.1)
- Unity Physics (0.2.4)
Additional note: At the time of publishing this article, there seems to be some issues with one or more of the most recent versions of the packages used, which causes the entity conversion to mess up the code somehow. I will update this article when the problem is fixed, but until then, make sure you use the packages with the given version numbers. This should normally not be an issue.
Scene conversion (objects to entities):
One of the biggest challenges with the current implementation of ECS, is that it can be difficult to physically set up and edit scenes, as entities can’t be interacted with in the scene view, even during runtime. Befitting of Halloween, they act like a bunch of spoops from the great beyond – visible yet intangible. To remedy this problem, Unity allows for the conversion of game objects into entities, by the creation of a subscene. Creating a subscene means taking a chunk out of your existing scene, adding it all to a new scene inside of the original.

Creating a subscene can be done pretty easily, once the packages are installed. You can add the scene objects into an empty gameobject (or just select what you want to include), then right-clicking the empty gameobject and selecting “New Subscene from selection.”
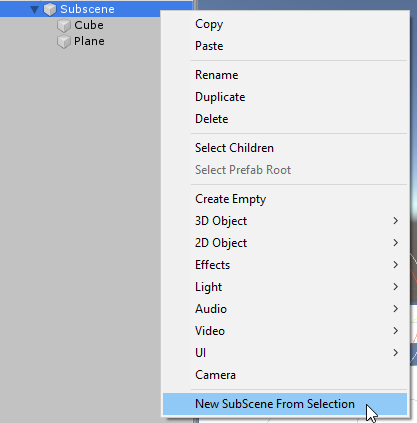
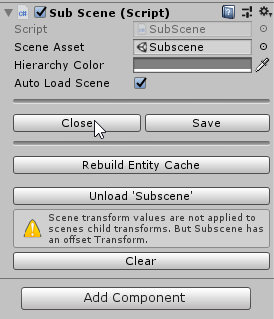
In this picture, this will put the gameobject and all of its children in a new subscene. However, everything in the subscene still remains as game objects. In order to complete the conversion of these objects into entities, select the subscene and press Close – at which point you’ll note that the gameobjects contained in the subscene will disappear from the inspector:
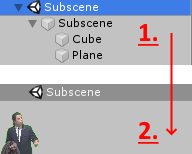
Resulting in:
Attaching scripts (ECS):
When writing scripts for objects in a scene, you should still write by the ECS architecture – components (data) and systems (functions) being in two separate files/contexts. However, there is an additional type of script which is now necessary: An authoring script must be attached to the object, which is responsible for adding components to that object, which the systems can then do work on. To reiterate:
- Components/Systems: Just like in pure ECS, write them as you would, but don’t attach them directly to the game objects.
- Authoring script: When converting to entities, this attaches the desired components to whatever game object it is attached to, allowing the systems to manipulate them.
Any classes inheriting from MonoBehaviour, if attached to a game object being converted to an entity, are ignored at runtime.
Naming standards:
It is common to follow the rules listed below, to make it easier to see how they are related to each other. Consider this example, where we’ll be implementing the rotation of an object:
- Component: Rotate
- System: RotateSystem
- Authoring: RotateAuthoring
The component takes the name of whatever it is meant to do, while the system and authoring scripts add their names as suffixes to the component name, making their relationship easily identifiable.
Does this mean an authoring script should be created for each component you want added to the object? Not necessarily. If multiple components work together to achieve some functionality, it is probably better to have all of those components attached via the same authoring script. Having an authoring script per component might make it easier to understand what will be attached, but that communicates less about the functionality of the individual components and increases the number of files so shift through.
Code example:
To exemplify the implementation of these concepts, I will walk you through the basic scripting process. The key thing to take away is really how the data is declared and associated with the entity at runtime, instead of being attached to it in the scene view as with an object.
I’ve simply put a cube object in my subscene this example, which I will rotate using ECS code. These are the files I’ve created:
Rotate.cs:
Starting with the Rotate component, very little code is written here:
using Unity.Entities;

public struct Rotate : IComponentData
{
    public float radiansPerSecond;
}
Nothing else will be added here, just the one float indicating the speed we will be rotating with.
RotateAuthoring.cs:
This file is different from regular ECS in that it actually inherits from MonoBehaviour. This is necessary for attaching it to the cube game object in the scene. However, it also inherits from IConvertGameObjectToEntity, which is what facilitates the conversion:
using UnityEngine;
using Unity.Entities;
using Unity.Mathematics;
using Unity.Transforms;

public class RotateAuthoring : MonoBehaviour, IConvertGameObjectToEntity
{
    [SerializeField] float degreesPerSecond;

    public void Convert(Entity entity, EntityManager dstManager, GameObjectConversionSystem conversionSystem)
    {

    }
}
The Convert function is required for the IConvertGameObjectToEntity to work, so it will automatically generate once the inheritance is added. It gets called when the object is converted into an entity. I’ve also put a float degreesPerSecond, whose values can be edited while the cube is a gameobject.
If we take a closer look at the Convert function, there’s a few familiar elements from the ECS article – particularly the Entity reference itself, as well as the the EntityManager which is what we used to construct and modify our entities previously. Which is exactly what we will be doing here again:
dstManager.AddComponentData(entity, new Rotate { radiansPerSecond = math.radians(degreesPerSecond) });
dstManager.AddComponentData(entity, new PostRotationEulerXYZ());
This will tell the entity manager to attach these two components to the object, when it is converted into an entity. In this case it’s a simple rotation speed, as well as the rotation component which we want to affect with this speed.
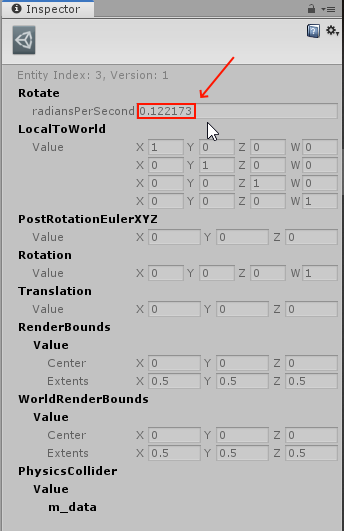
To illustrate how and when this is executed, let’s take a look at the cube object, with the RotateAuthoring script attached to it. I’ve put in my favorite number, but you can have whatever value you’d like:

Now if we close the subscene and convert the cube back into an entity, we will find that it has executed the code from the Convert function and turned the value into radians (the Entity Debugger can be found under Window > Analysis > Entity Debugger):
RotateSystem.cs:
Next we’ve got the system responsible for manipulating the component data. As mentioned in the ECS article, systems run on their own and are not attached to any objects or entities. Here’s a barebones sample of what a system without any code can look like:
using Unity.Entities;

public class RotateSystem : ComponentSystem
{
    protected override void OnUpdate()
    {

    }
}
The OnUpdate function is similar to the regular Update in MonoBehaviour, which executes once per frame. The syntax is once again identical to the previous article. The following code will modify the cube’s rotation:
using UnityEngine;
using Unity.Entities;
using Unity.Transforms;


public class RotateSystem : ComponentSystem
{
    protected override void OnUpdate()
    {
        Entities.ForEach((ref Rotate rotate, ref RotationEulerXYZ rotation) =>
        {
            rotation.Value.y += rotate.radiansPerSecond * Time.deltaTime;
        });
    }
}
Long story short, there is no difference in the way it is written, whether you’re using this approach or pure ECS.
Jobs and the Burst Compiler:
I have written a separate article about these, go check it out if you haven’t already. However, here’s a short recap:
Jobs allow for multi-core execution of behaviours, while the burst compiler allows for these jobs to be compiled to assembly code, making them run faster than Sonic the Hedgehog on a whole bottle of methamphetamine. Not everything can be run as a job, some things depend on execution in the main thread to function, but most of the times this should not be an issue.
The Jobs are slightly comparable to functions, in that they have to be defined and called. Let’s rewrite the system script from above, to make use of the job system. Here’s what it looks like in its most basic form:
using Unity.Entities;
using Unity.Transforms;
using Unity.Jobs;

public class RotateSystem : JobComponentSystem
{
    private struct RotateJob : IJobForEach<RotationEulerXYZ, Rotate>
    {
        public void Execute(ref RotationEulerXYZ rotation, ref Rotate rotate)
        {
            // Code goes here
        }
    }
    protected override JobHandle OnUpdate(JobHandle inputDeps)
    {
           // Code goes here
    }
}
Let’s compare this syntax with the previous code example, to highlight what has (and hasn’t) changed:
Differences:
- The class inherits from JobComponentSystem instead of ComponentSystem
- The job itself, RotateJob, is declared separately and is a struct
- The syntax for OnUpdate has changed a little, now acting as an override for JobHandle, which requires an input parameter.
Similarities:
- The definition of RotateJob is quite similar to the code for the non-job (the unemployed?) system, in that it has to be told what components it should look for, when going through the entities.
Next thing we’ll need to reimplement the functionality to rotate the cube. Here’s the complete code needed to achieve the same result as before:
using UnityEngine;
using Unity.Entities;
using Unity.Transforms;
using Unity.Jobs;

public class RotateSystem : JobComponentSystem
{

    private struct RotateJob : IJobForEach<RotationEulerXYZ, Rotate>
    {
        public float deltaTime;
        public void Execute(ref RotationEulerXYZ rotation, ref Rotate rotate)
        {
            rotation.Value.y += rotate.radiansPerSecond * deltaTime;
        }
    }

    protected override JobHandle OnUpdate(JobHandle inputDeps)
    {
        var job = new RotateJob { deltaTime = Time.deltaTime };
        return job.Schedule(this, inputDeps);
    }
}
Additions:
- The public float deltaTime needs to be declared, even though this is not a component. Doing this is necessary when working with multi-threading, so that it can be “carried over” and execute away from the main thread. The value is declared in the main thread as Time.deltaTime still.
- The code to rotate the cube now uses deltaTime instead of Time.deltaTime, because of the above.
- An instance of RotateJob is declared, passing in the values which it should use.
- The Schedule member function of the job is used to schedule the job. It takes this system as a reference and the inputDeps parameter <for reasons I have yet to determine, WIP>
The takeaway is to always think about what values you need the job to work on, then declare those to make sure they can run separately from the main thread.
Finally there’s the Burst Compiler. Adding this to a job is super easy, as it only requires a single line of code. The only reason that jobs do not use the burst compiler by default, is due to some features not supporting it. Whether this is something that will change later is hard to tell. But for the most part, this should not be an issue. To enable burst compiling of the job, include the Unity.Burst library:
using Unity.Burst;Then simply add the following line before the RotateJob declaration:
[BurstCompile]For the sake of clarity, here’s the code again with the burst compiler added to it:
using UnityEngine;
using Unity.Entities;
using Unity.Transforms;
using Unity.Jobs;
using Unity.Burst;

public class RotateSystem : JobComponentSystem
{

    [BurstCompile]
    private struct RotateJob : IJobForEach<RotationEulerXYZ, Rotate>
    {
        public float deltaTime;
        public void Execute(ref RotationEulerXYZ rotation, ref Rotate rotate)
        {
            rotation.Value.y += rotate.radiansPerSecond * deltaTime;
        }
    }

    protected override JobHandle OnUpdate(JobHandle inputDeps)
    {
        var job = new RotateJob { deltaTime = Time.deltaTime };
        return job.Schedule(this, inputDeps);
    }
}
And boom, now the job compiles to assembly code, which runs a bajillion times faster.
Organising subscenes:
When using this approach to scene edit, it may be wise to think about how the scene can be split into multiple subscenes, to prevent lag while editing. If the subscene contains thousands of objects, any edits will leave your level designer screaming in agony, as the framerate makes like the Titanic. By splitting into multiple subscenes, it becomes possible to edit one at a time, then convert it back into entities before editing a different one.
GPU instancing materials:
While old news to some, make sure to enable GPU instancing on the materials used, to reduce the number of batches running per entity. This also helps with the scene editing problem above. The reason I mention this here, is due to how many objects you can now handle in a scene, performing this step can have an even bigger impact on your game’s performance.