ECO Telemetry (final exam)
As I have previously mentioned in my posts about AI and data collection/analysis, many of the prototypes showcased on this website were developed for the purpose of being implemented into a complete project. That is what my final exam became. We named it “ECO Telemetry”, which was fancier than “weird animals eating mushrooms and running for their lives simulator.”
We built a simulated ecosystem, complete with herbivores, carnivores and plants. The big twist was that the animals are capable of memorizing other objects, then use those observations when decisionmaking. On top of the AI running these animal behaviors, we added basic telemetry collection (storing positions of animals over time) and analysis (displaying a heat-map of these positions, complete with customizable database queries for only showing coordinates from specific intervals). In this article, I will go through the different systems that were used to make this happen, complete with links to the individual prototype documentation for each of them.
This article is meant to act as a portfolio piece more so than an educational one.

The build(s)
Before I get into how everything was developed, I want to give a quick overview of what exists and how it works. The project files can be found in the following links, but be aware that the URLs to the online database have been redacted in both clients, for reasons of personal security:
Please note: There are problems with the current ECO Final package, which allows you to open and inspect everything that’s in it just fine, but throws an error when you try to run it. I am looking into this issue, as it seems like this is caused by certain default values being initialized wrong – something I have changed from the inspector but not in the code. I will update the file once I figure it out.
“ECO Final” client:
The “ECO Final” package contains the game client, housing the virtual ecosystem and all of its related assets. Once you load it up, open up the scene file “Assets > Scenes > SampleScene“. If Unity starts spewing error messages at you at this stage, don’t worry. There’s a debugging feature attached to the animals in the scene, which runs both when the scene is played or when you are in the editor. It is simply complaining that the memory systems of the animals aren’t live, when the scene isn’t running, but they’ll disappear as soon as you press Start in Unity. If it gets too annoying, open up the animal prefabs (“Frig” and “Catypus”) and under the Memory Script component in the inspector, set the Debugging bool to false.
When pressing Play, there really isn’t much of a game to it at this stage. The animals will run around and observe the environment, while periodically making decisions about what to do. If the sleep and food stats of an animal are at a certain level, they will look for mates and multiply. The game elements which weren’t implemented, were to let a VR player add or remove plants and animals from the scene, in an attempt to balance out the ecosystem. With the current numbers, the carnivores tend to hunt and eat all of the herbivores, before dying of hunger themselves. However, an environment consisting only of herbivores and plants seems to balance out, mostly due to the spreading rate of the plants.
Known issues: When a Frig is fleeing from one or more Catypus, it gets stuck “Fleeing.” I am currently trying to fix this issue, as it means they effectively die from the fright, once they start running. I’ll update the project file once this issue has been resolved.
“ECO Telemetry analysis” client:
This client handles the visualization of positional telemetry data, which the animals have periodically submitted. Unfortunately I have had to redact the connection URLs, for security reasons. But if you can set up your own SQL server, here are the PHP files we used to handle the get- and set-requests from the two clients:
<TODO: Upload the PHP files>
Alternatively, if you see me in person, I can show you how it looks and runs on our own server.
When you unpack the files, open the scene file “Assets > Scenes > SampleScene“. Here you will see an object named Retriever in the scene hierarchy, which is the one that contains the components for both data retrieval and visualization. Locate the Retrieve Data script component, to configure the datetime filter for what samples should be retrieved, as well as the upper limit for number of samples.
If you want to modify the size of the grid which the heatmap is displayed within, you may modify the properties of the Visualize Data script component found on the same object:
- Grid Res X, Y and Z: These allow you to determine how many cubes should appear along each axis of the grid.
- Grid Size X, Y and Z: These are updated in runtime, to show you the size of the grid in meters. You can enter your own numbers, but they won’t be considered when generating the grid.
- Start/End Coord X, Y and Z: These are the values which determine the size of the grid. I have chosen this approach for the project, as we could simply look at the other client to find the corner coordinates of the scene, then use the same ones here to cover the same area.
- Dynamic Size: Setting this to true will ignore the start- and end-coordinates from the previous input fields, instead looking at the positions of the Retriever and EndCoordinate objects in the scene, spanning the grid between these. This allows the user to move the objects around, instead of entering the coordinates manually.
Components
With everything being developed and tested individually before implementation, it is easy to list each of the components which make up the whole. Below is a list of links to the prototypes and a short description, put into their respective categories. You can skim these for a general overview:
AI components:
Sight and memory:
Prototype:
A system used to allow the AI to observe and remember other game objects in its surroundings. It comes with a simple API for handling these observations, such as verifying if an object has been seen before, returning a list of observations of a specific type of objects (eg. where did I see mushrooms?), returning the most recent observation of a specific type etc. This system is used in conjunction with the AI’s decision-making processes, to create behaviors that are influenced by what the AI has previously observed.
Implementation:
With the prototype being developed on its own, the API functions which would allow other systems to make use of the memories and observations it generated, were added during the exam.
All of these new functions were added to the MemoryScript class, contained inside the MemoryScript.cs-file, which is attached to both the Frig (herbivore) and Catypus (Carnivore) prefabs.
Decisionmaking (weight-based random):
Prototype:
This system is used for decisionmaking, which looks at the internal stats of an animal, prioritizing those that are more critical, above those that are not. There is still a small chance that non-critical behaviors are chosen, but every option is weighed relative to one another, with the critical ones increasing exponentially. This allows for fairly randomized decisionmaking, but should generally commit to what will keep the animal alive. This same system is used when generating loot drops in RPGs, or in lootboxes. For some reason, this article received a ton of views from China.
Implementation:
When this system was added to the exam project, the primary change was in configuring it to use the animal’s internal stats (food, sleep, stamina) to determine what result should be returned. A function called ModifyUtilities was added, to enable different preferential scaling on each stat (eg. low food vs low sleep at the same values, would weigh food at an exponent of 3, but sleep at an exponent at 2, preferring food when both are critical).
All of the weight-based randomization functionality was written into the FSM class, contained in the FSM.cs-file, which is also attached to both of the animal prefabs.
Decisionmaking (finite state-machine):
Prototype:
The finite state-machine is more of a blueprint than a bunch of complex code. In practice, it is a switch-case containing a case for each of the animal behaviors, allowing for execution of the functions relevant to each behavior. This system was one of the only ones that weren’t really prototyped away from the exam project, as it is mostly a simple scaffolding for everything else. Because of this, the linked documentation doesn’t reflect the implemented version 100%, but the general philosophy remains the same.
Implementation:
The finite state-machine system was implemented with a simple switch-case, checking an enum (called behavior) which indicates the state of the animal, then executes the relevant behaviors. The frequency of this check is set at an interval of a few seconds, by calls to the Query IEnumerator. The biggest deviation from the blueprint was the fact that some behaviors needed to be executed more frequently than others, meaning that an additional switch case had to be put inside of the Update function of the finite state-machine script, checking the same enum. However, this high-frequency check does not perform any state transitions (changing the value of the behavior enum).
The finite state-machine was implemented inside the FSM class, contained within the FSM.cs-file, which is attached to both of the animal prefabs.
Fleeing behavior:
Prototype:
When faced with one or more threats, the AI calculates the optimal direction for escape. This prototype illustrates how those calculations are made, using simple vector math. The link is not an article but a PDF-file, as I have not written a proper article on the topic. The blue cube in the video is the animal trying to escape – the red cubes are what it is escaping from. The little green cube indicates where it wants to escape to. When there are no obstacles in the way, the green cube will always be at the end of the red line. But as soon as the red line collides with an obstacle, white lines make distance measurements to find out where it can move to. Smaller obstacles require multiple samples at narrower angles, to approximate where their edges are located.
Implementation:
The implementation of this system was a little less graceful than I had hoped, but we were running low on time, so I jammed it inside the FSM class. The calculations from the prototype remain unchanged however, the biggest change were to use the sight and memory system’s API to generate a list of threats, instead of the fixed list of threats used in the prototype. This was simply done by creating a function called GetPredatorsInRange, which queries the animal memory for all memories of threats within a certain distance of the animal’s current position.
The fleeing behavior was implemented inside the FSM class, contained within the FSM.cs-file, which is attached to both of the animal prefabs. However, this behavior is never executed if the animal is a carnivore, as there are no threats to them in this ecosystem.
Search behavior:
Prototype:
A simple system to generate a field of points in the navmesh, which the AI can use to randomly explore an area. It uses easily configurable parameters to change how the field is generated. This behavior is used when an animal decides to do something, but has no memory of the desired object type (eg. “I want to eat but have seen no mushrooms/herbivores”).
Implementation:
This system remains largely unchanged from the prototype, as it is easily accessible by a call to the ReturnPath function, which returns a list of the coordinates it has found. The values for its parameters has been tweaked a little, to create paths of a desirable size and complexity for an environment of this scale.
The search behavior was implemented in the SearchScript class, contained within the SearchScript.cs-file, which is attached to both of the animal prefabs.
Move system:
Prototype:
This system is used to dynamically update the Navmesh Agent of the AI with a new path, as smoothly as possible (without anything breaking). It keeps track of the path currently being followed, as well as how far the AI is along that path. It has a small API that receives the new path, then automatically resets the index to indicate that the animal is now at the start of the new path.
Implementation:
With the prototype and the implementation in the exam project both using Unity’s built-in AI agent system, the logic remains unchanged. However, instead of it being contained in a separate class (the prototype contained the logic in a class called AnimalScript), it was merged into the FSM class. I would prefer to separate these two, if I were to redo the project in the future.
As mentioned, the move behavior is located inside the FSM class, inside the FSM.cs-file. It is called from the Update function, where a bool called shouldMove determines if the Move function is called or not each update.
Telemetry components:

Collection (positional telemetry):
Prototype:
This article deals with the collection of positional telemetry from the animals, sending it off to an online database, which is configured to properly format and store the data.
Implementation:
What’s described in the article is for general users, so the example uses Google forms for storage. However, in the exam project, the system is moved to an SQL server, due to the need for custom PHP, to perform specific queries instead of downloading all of the data each time. Another difference is the fact that the implementation of this system submits positions at regular intervals, rather than when pressing a button, as was the case for the original prototype.
All of the logic for sending the data is contained within the Submitter class, within the Submitter.cs-file, which is attached to both of the animal prefabs. This component can be attached to any object whose positions should be routinely stored in the database. However, at the time of writing this article, there is currently no way to differentiate whose positions are being retrieved upon analysis.
Retrieval and analysis (visualization):
Prototype:
This article is all about retrieving the stored data, reformatting it so that it is workable, then using the result to display a heatmap of where the animals have been over a period of time. Once again, the version in the exam project has been expanded to work with the custom PHP get requests, to reduce the amount of data sent, and allow for queries from specific moments in time.
Implementation:
The funny this about this system, is that the prototype actually became the final implementation during the exam. This is due it already being run in a separate client, with the biggest difference being the fact that it was accessing a different database than in the prototype, with a specific PHP get request rather than just a URL to a CSV-file on Google forms.
Miscellaneous components:
Weather system (cloud spawner/mover):
Prototype:
With VR support being planned as part of the project, a system would translate a position from the VR controller’s trackpad, into a vector indicating wind direction, allowing players to control this. This required a setup where each of the cloud objects were aware of the current wind direction and speed, then updated themselves accordingly. This prototype also includes randomly spawning clouds within an object’s boundaries, as well as updating the position of this object to ensure that clouds would always fly over the scene, when following the wind direction. Lots of vector math.
Implementation:
Largely the same again. The API still just requires a Vector3 for the wind direction. The only thing that was really changed, was a small mistake I had made in the prototype, where I was using some world coordinates instead of the location of the objects, making it misbehave when moving it around.
Cel shading:
Implementation:
With Unity’s default shaders being absolute bollocks when it came to performance (especially in VR), I wrote my own shaders for this project. Most notably I wrote one which applies simple cel shading, by extruding the vertices, drawing the backfaces and giving them a solid color for the outline effect. I also wrote a vertex displacement shader for the water effect, which is not as explicitly documented, but you can read about the basics here, here and here.
Plant spread algorithm:
Prototype:
I wrote an algorithm separate from the animal AI systems, to help spread the plant around the environment. It uses pathfinding to make sure the plants only grow in places reachable by the animals. In retrospect, this could have made use of the search behavior from the animals instead, but writing it separately made it a little easier to focus on one problem at a time. This is a PDF-file, as I have not written any articles on the subject.
Implementation:
Beyond a little bit of number-tweaking for the algorithm’s input parameters, the algorithm did not change a whole lot, as the act of checking for collisions and instantiating new objects is fairly context independent. However, the original prototype did have a few bugs that were only apparent in the exam project – which were fixed during implementation.
An additional feature developed for the plant system during the exam, was rescaling and recolouring of the plants, to indicate the age of each plant, instead of just showing whether they could spread or not. Additionally, plants now wither and despawn when they become too old, to create an environment that looks a little more active.
The process:

With the prototypes being covered, next we’ll take a look at how the whole project is stitched together. It started as an idea, we wanted to make a garden sim ala Viva Piñata with some measure of VR support, but were fairly restricted on both time and manpower, so we had to focus the scope on what elements would be the most technically interesting.
For me it was really the AI – giving it the ability to see and remember things, then letting it use that information when deciding what to do, was something I just really wanted to try out. I wouldn’t normally recommend this approach when making games, because the “fun” aspect weren’t much considered, but for something that should showcase technical prowess, it worked pretty well. Oh and we used Trello for managing tasks, feel free to take a look at it:
The world:
One of the first things we started working on, was the look and layout of the world. We knew we wanted a small environment and a stylized look, mostly due to our time constraints and optimization capabilities when working in VR. This meant working with low-poly assets and writing custom shaders to make the most of them. But to determine what should be made, we first had to do some mockups of what the world was supposed to look like. We brainstormed a bunch of interesting geometrical features, then put them on a whiteboard for reference:
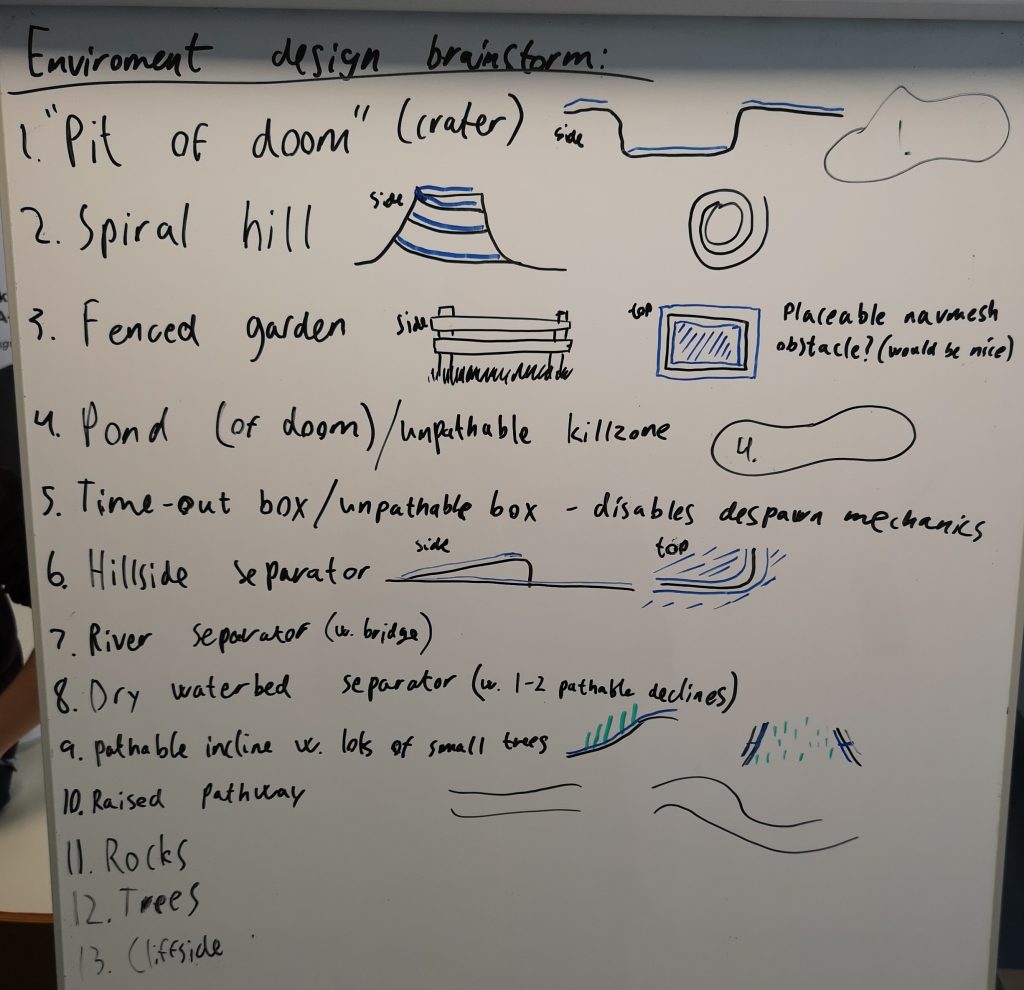
Not all of these ideas made it into the exam project, unfortunately. Some of these, particularly the pits, were dependent on the player throwing the animals around, which needed the VR support that we didn’t have time to implement. But with this list it was possible to run a few environmental sketches, just to get a feel for what assets we should build:
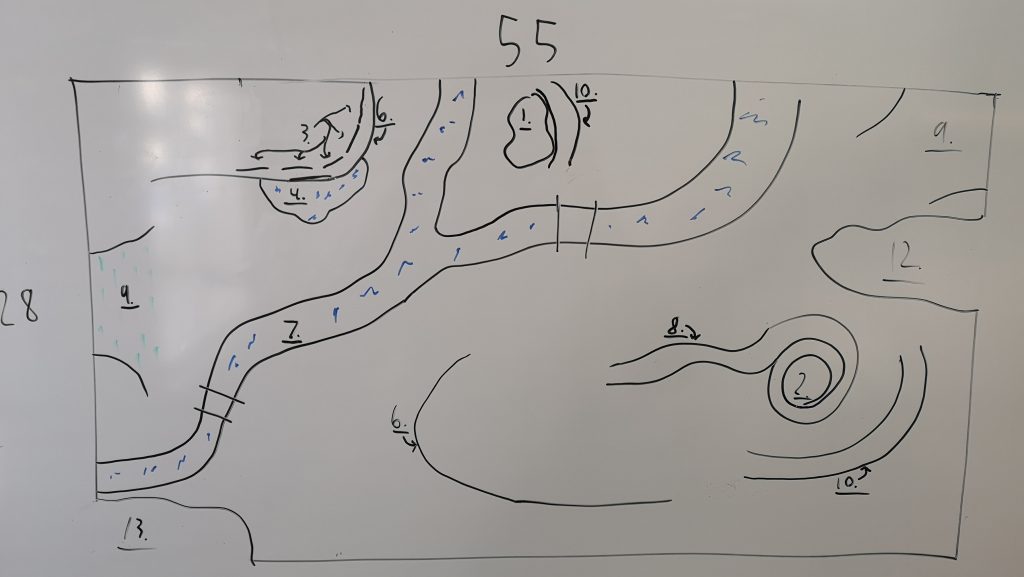
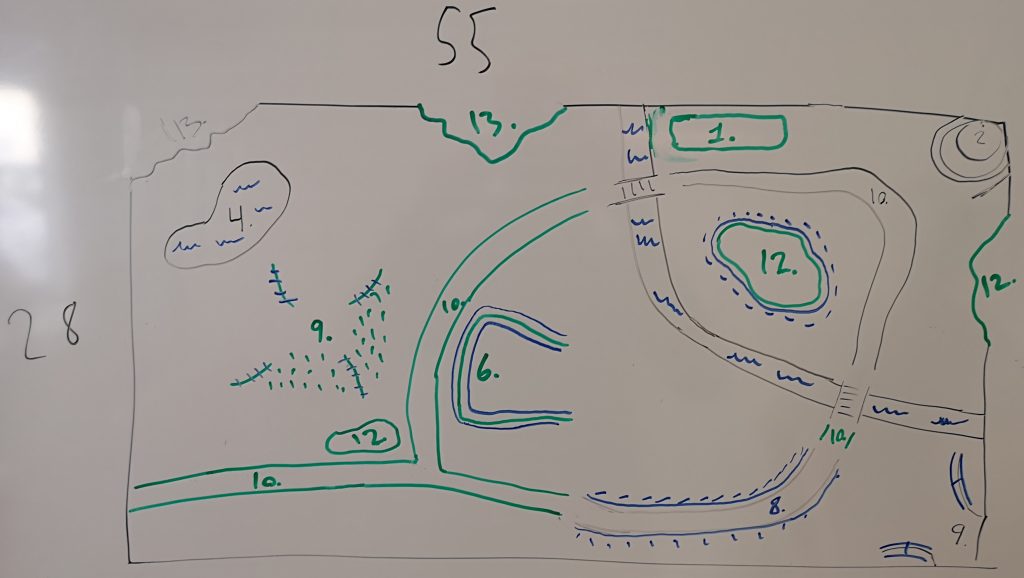
We quickly agreed that the size format of 28×55 meters was appropriate, by going outside and counting steps along a real grassy field. The final layout was mostly inspired by these mockups, rather than following them exactly. Chunks of protruding geometry (knolls, rocks, hillsides etc.) were created as individual assets, whereas any carved features (holes, rivers etc.) were carved into a single mesh. The final layout looks like this:

The biggest difference from the mockups being that there are no bridges, allowing the top right area to act as its own little ecosystem, if anything is spawned in there.
Beyond using my cel-shading shader, the water was animated by blending two textures together and scrolling their UVs to move the textures unevenly across the surface. The vertices of the mesh was then displaced by a time function, looping through sine- and cosine-waves to emulate small waves.
The AI:
Designing the AI was an interesting challenge, as I wanted to create one general system to handle the logic of both animals. While the blueprint for the finite state-machine has already been described, the way the system differentiated between the animals were by setting the value of an enum, to indicate if it should transition one way or another. This is used to differentiate what the animal eats or if they are able to make use of the fleeing behavior, for example.
The thought process behind what behaviors should be built for the animals, rooted in observing animals in the wild, then trying to describe what we saw as a “what would be mechanically required to visually mimic this.”
The sight and memory system underlying these behaviors, was also prototyped on whiteboard before anything was coded:
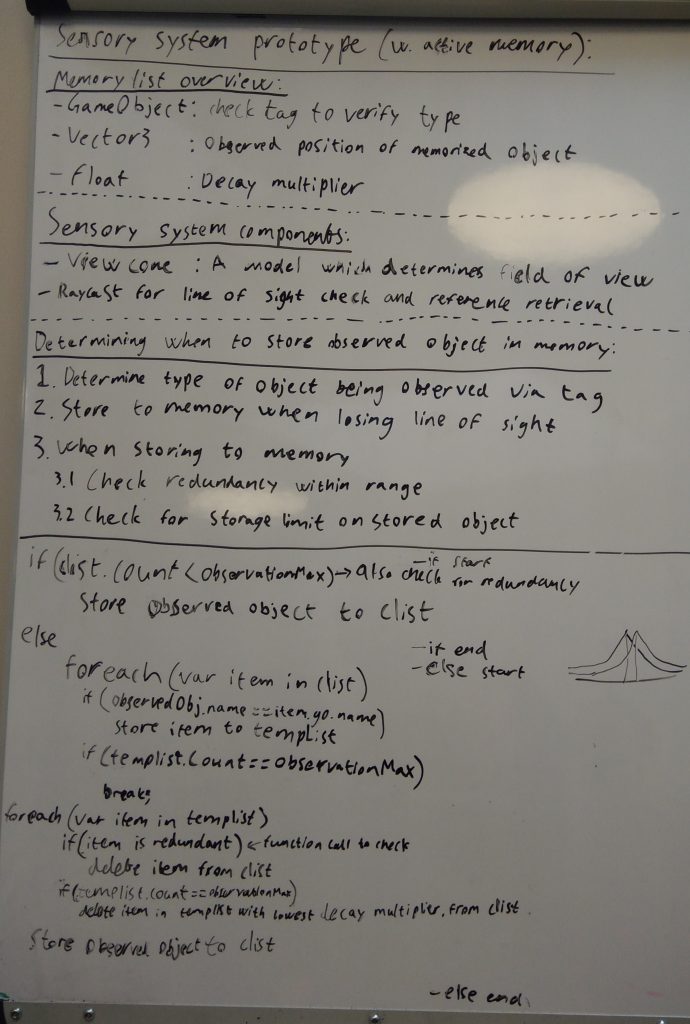
What’s worth noting here, under the “Determining when to store observed object in memory” category, is that we didn’t use the “store to memory when losing line of sight approach.” The reason for this is that all of the animal’s decisionmaking became dependent on the memory system – meaning it could not act on something that was not stored in its memory, even if it was looking straight at it. Instead we made the animals memorize everything as they saw it, allowing them to act on those memories immediately.
Also note the weird “tent” drawing to the right of the whiteboard. We tested some elements of point based influence, which were actually prototyped but not implemented (again due to time constraints), which would make the animals even better at self preservation. The idea was to let the animal examine all previous observations of predators, to create an average likelihood of it meeting a predator, if going to eat a plant it has seen near those observations, for example.
A final element which was considered but not included, was to randomly assign certain traits to the different animals, then make use of reinforced learning (by implementation of a genetic algorithm) to let offspring inherit those traits, as well as introduce a chance of mutation. This would not only have lent to interesting developments over time (finding out what traits are most favorable), but would also have been an interesting subject for data collection and analysis, to see how traits were evolving over time. This was omitted due to time constraints.
The telemetry:
The telemetry systems were our attempt to ape part of what Unknown Worlds had done with their own game, Subnautica, partly to learn how it was done in the first place. In their environment, they were collecting the positions of players to find out where people preferred to go within the game world. In that sense, the design was already set – we just had to find out how to replicate it ourselves. If we had more time to work on it, I would probably have made it less rigid, as it currently requires the user to press Play in the Unity editor before it queries for data. This means it has to be stopped and started again every time we need a new sample, which is less than optimal.
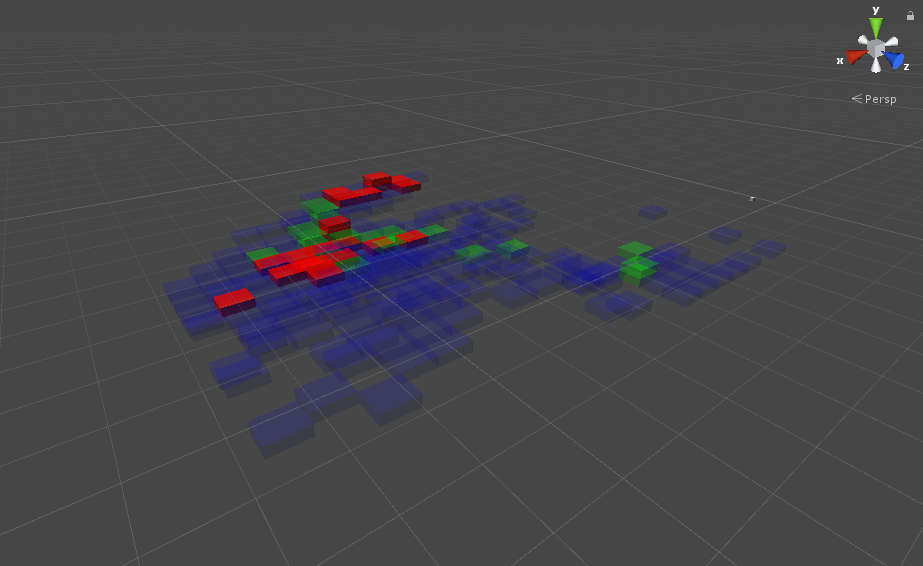
I wrote a shader to handle the heatmap visualization, which allowed for both modification of the transparency of the material, as well as to indicate what colour it should use. A script would then modify these values for each cube in the grid, to reflect how high a percentage of the retrieved observations was stored within that cube.
Part of the system which were in the talks but not developed, were the display of 2D graphs for trends over time – like how many animals existed at a certain point in a run. This would have required an extra parameter to differentiate each run, like the combination of random letters and the timestamp, for example. This would work well in conjunction with the genetic algorithm to show how average trends for different traits would move as mutations occurred or something turned out to be favorable and plateau the values. This feature was omitted due to time constraints.
Conclusion:
While there really isn’t much of a GAME in there just yet, the tools we developed still holds a wide array of applications for different contexts. For example, the sight and memory system could easily be applied to a different AI, like someone moving to a new place having to explore to learn where everything is located. It would be easy to expand this to allow AIs to share such knowledge, by simply copying the memories between them. Or put the positional telemetry script on the player object and heatmap where they’re going, to better understand how they react to your design.
There’s always room for improvement, of course, especially with the omitted features from the original design draft. I may update this post in the future, if I go back and add those.